Here is my second article on Intune regarding Onboarding. In the previous blog I’ve showed “Automatic Enrollment of Windows 10 devices to Microsoft Intune”, if you haven’t read then, here is the link https://lnkd.in/dNPwsz7w
In this article we will onboard Win10 device to Intune by creating autopilot profile. Autopilot is a great feature for MSPs to onboard their new or existing devices to Intune. In this article I’ll show you how to onboard Azure AD join device to onboard on Intune not hybrid.
Below is the model to understand the whole process.

Windows and License requirement below.


We have to go to Azure portal, Azure Active Directory > Devices > Device settings and check if the setting is enabled for all users.

Then go to Mobility (MDM and MAM) > Microsoft Intune on Azure portal.

Click on to this particular option which says “Microsoft Intune” and here what I have done is I have scoped Microsoft Intune for all users or for all the categories to be very precise.
This scope is for when the device will get onboarded to Azure active directory, so set the scope either for all users or for specific groups. In our case we can use “All” but for testing purpose I have chosen selected groups.

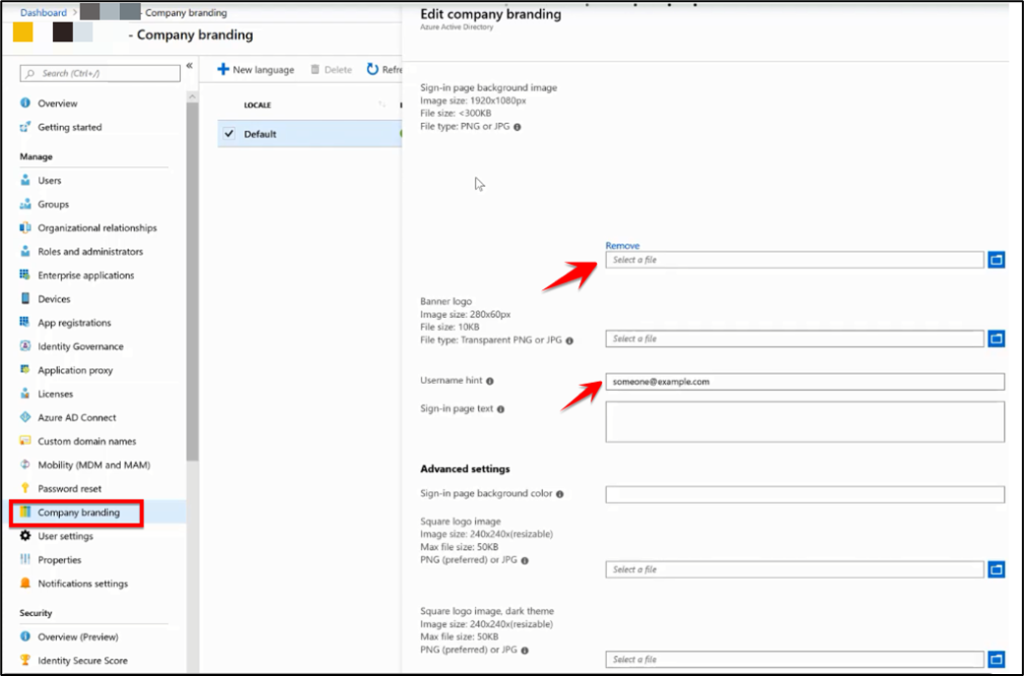
Now we can set our Company branding, Azure Active Directory > Company branding. We can upload our company logo which will be shown when user will login with his or her Microsoft account and also set a hint for login which helps user to understand “abc@example.com”, these settings are optional.

Need to set the CName record if you haven’t added already. Open Intune portal>devices>Windows-Windows Enrollment

After all of that we need to create the Auto pilot profile on Intune portal.
Intune portal>devices>Windows-Windows Enrollment

Enter the profile name and we can deploy this profile to all devices except hybrid one. For that we have to select “Yes”, this option will also convert devices to Autopilot who joined with “Automatic Enrollment”.

- In Out of box experience page, we will select “user driven” which means user will login so here we will pick User-Driven option instead of Self.
- In the second option we will pick Azure Ad join not Hybrid join which you will find in the drop-down list.
- We will keep hide the software and privacy terms.
- We can set the user as standard.
- We can say Yes to “OOBE” because sometime when user has very poor bandwidth and we want everything to install everything before handover and at that case we will select yes to this option. Also, system will boot with admin privileges.
- We can set the Language and Keyboard settings.
We don’t need to add custom naming template for the devices as this can be managed cloud base so we can give the name by ourself.

Here on this option, we need to select “All devices” or we can also create groups for devices if we have but “all devices” is a preferred option.

After creating profile, we need to ask Hardware Id csv file from the Vendor so we can import or if we have device then we can run the script to export the hardware ID from that device.
You can find the script from this site https://docs.microsoft.com/en-us/mem/autopilot/add-devices#powershell . I already pasted it below and we need to run this in the PowerShell as an admin and type “Y” option every time it asks. It will download the CSV file and will be saved at this location “C:\HWID”.
New-Item -Type Directory -Path “C:\HWID”
Set-Location -Path “C:\HWID”
$env:Path += “;C:\Program Files\WindowsPowerShell\Scripts”
Set-ExecutionPolicy -Scope Process -ExecutionPolicy RemoteSigned
Install-Script -Name Get-WindowsAutopilotInfo
Get-WindowsAutopilotInfo -OutputFile AutopilotHWID.csv
When we get the Hardware ID CSV file then we need to go to Microsoft Intune> portal>devices>Windows-Windows Enrollment and here select “Devices”

Import that file.

Device will be imported here after few minutes and we can also give that device a name.

Assign that Device to a user.

Then run the system and login with that user’s Microsoft account. Device will be joined to Intune and you can also control that device from the portal as shown below.

Please let us know if you found this article helpful.


