


The Inbox Repair Tool is your first-aid-kit when it comes down to corruptions in your Outlook’s data storage file (pst-file).
https://www.youtube.com/channel/UCLop2-XaRme45Pg9X7UmfOQ?sub_confirmation=1

A common need for running this tool is when Outlook refuses to load or is not willing to open a pst-file and displays an error similar to;

Additional often seen variants are;
Cannot start Microsoft Outlook. Cannot open the Outlook window. The set of folders cannot be opened. Errors have been detected in the file <path to pst-file>.
Errors have been detected in the file <path to pst-file>.
The file <path to pst-file> is not an Outlook data file (.pst).
In other cases, you might get recommended to use this tool when you are suffering from some specific symptoms such as (but not limited to), Outlook crashing upon displaying a folder or writing data to it, mspst.dll errors in the Event Viewer,
import/export not completing, several send/receive errors or view settings not being maintained.
This guide helps you locate the Inbox Repair Tool for your version of Outlook, walks you through the repair process and gives recommendations what to do to when the Inbox Repair Tool fails and how to prevent pst-file corruptions from happening in the future.
Locating scanpst.exe for your Outlook version
The location of scanpst.exe depends on your version of Outlook and whether or not you are using a 64-bit version of Windows.
Microsoft 365 / Outlook 2019 / Outlook 2016 Click to Run
any Windows; C:\Program Files\Microsoft Office\root\office16\
Outlook 2016 (MSI-based Volume License installation)
32-bit Windows; C:\Program Files\Microsoft Office\Office16\
64-bit Windows; C:\Program Files (x86)\Microsoft Office\Office16\
64-bit Outlook; C:\Program Files\Microsoft Office\Office16\
Outlook 2013
32-bit Windows; C:\Program Files\Microsoft Office\Office15\
64-bit Windows; C:\Program Files (x86)\Microsoft Office\Office15\
64-bit Outlook; C:\Program Files\Microsoft Office\Office15\
Outlook 2013 Click to Run
any Windows; C:\Program Files\Microsoft Office\root\office15\
Outlook 2010
32-bit Windows; C:\Program Files\Microsoft Office\Office14\
64-bit Windows; C:\Program Files (x86)\Microsoft Office\Office14\
64-bit Outlook; C:\Program Files\Microsoft Office\Office14\
Outlook 2007
32-bit Windows; C:\Program Files\Microsoft Office\Office12\
64-bit Windows; C:\Program Files (x86)\Microsoft Office\Office12\
Running the repair process
The repair process consists out of several steps. If you already know the location of the pst-file that you would like to scan, continue to starting the scanning process.
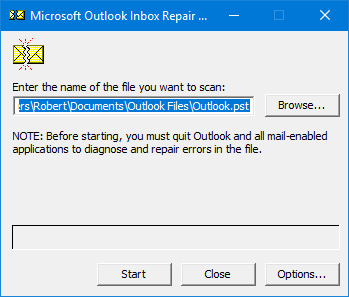
When you start the Inbox Repair Tool (scanpst.exe), the first thing it prompts you for is the location of the pst-file to scan. This path is revealed in the startup error or otherwise the default locations are as follows;
- Outlook 2007 and previous
C:\Users\%username%\AppData\Local\Microsoft\Outlook\ - Outlook 2010, Outlook 2013, Outlook 2016, Outlook 2019 and Microsoft 365
C:\Users\%username%\Documents\Outlook Files\
Step 2: Starting the scanning process
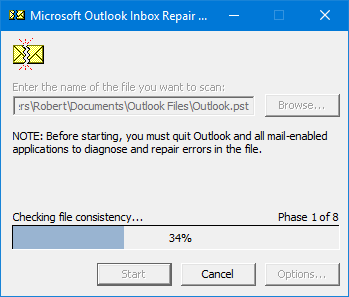
After you have selected the pst-file to scan, you can press the Start button. At this point, nothing will happen to your pst-file yet; scanpst will do an analysis first. This analysis consists out of 8 phases of which some can take quite a bit longer to complete than others depending on the size and level of corruption of the file.
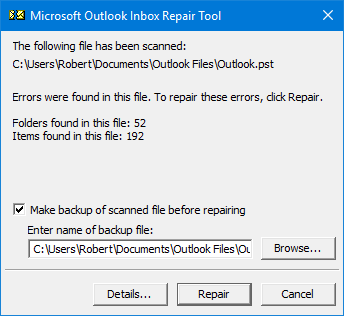
After the analysis scan has completed, it will present you with a scanning report and options for the next step. You can press the Details… button for more information about the type of corruption.
Step 3: Starting the repair process
Before you continue to the actual repair process, make sure you have a backup of the pst-file. If you do not have a backup already, make sure that you have the option set to make a backup before proceeding (selected by default).
After pressing the Repair button, the actual repair process will start and go through the 8 phases again. With a very large pst-file (larger than 4GB) and a slower hard disk, this process can sometimes take longer than half an hour.
Step 4: Repair completed
If everything goes correctly, you’ll get the “Repair complete” dialog after some time. You can then press OK to close it and start Outlook again.
If everything works now; you’re done but you might want to read the prevent pst-file corruption.
