


With Windows System Preparation Tool (Sysprep) tool, you can create a customized Windows 10 reference image. You can install all apps, drivers, and updates in the image. After that, you can deploy Windows image to users’ computers within your company.
In this article, we’ll show how to use Sysprep to create a reference image on Windows 10. Use this guide to create a Windows image that is ready and you can deploy it on a physical or virtual machine (VDI solutions).
What is SysPrep?
Before deploying a Windows image on users’ computers, you need to configure a reference image. Install the necessary drivers, applications, and configure other Windows settings. The resulting image must be generalized by deleting computer-specific information (SID, GUID, etc.). You can generalize the Windows image with the Sysprep utility.
Sysprep allows you to delete all the information related to a specific operating system. This includes unique identifiers (SID, GUID, etc.), the Windows activation reset, and installing apps and drivers in the Audit mode.
All the configuration of the operating system before you run Sysprep remains untouched. This includes the installed software, personalization and network settings, installed and pinned Metro apps on the start screen, File Explorer, and other parameters.
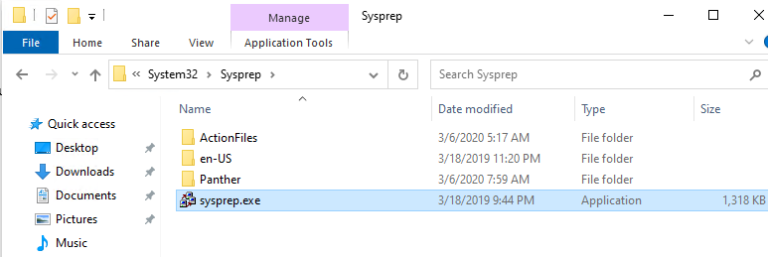
In Windows 10 and Windows Server 2016, the Sysprep.exe utility is located in folder C:\Windows\System32\sysprep.
Benefits and Disadvantages of Using Sysprep
Syprep’s benefits:
- The customized reference Windows 10 image allows you to quickly deploy a ready-to-work environment on a user’s computer. You do not need to install drivers, programs, security updates. Also no need to configure custom Windows Settings on each computer;
- You can deploy the Windows image using the answer (unattended) file. After the installation, you do not need to select the various options on the initial Windows 10 setup screen;
- At any time, you can extract the image, make changes to it, and update it with the deployment tool.
Disadvantages of Sysprep:
- The size of the Windows reference image can be significantly larger than the clean Windows 10 installation ISO image;
- Periodically you have to update the versions of programs and drivers injected into the reference image.
How to Create a Windows 10 Reference Image?
You can create your reference WIM image of Windows 10 through the following steps:
- Perform clean Windows 10 install from the ISO image, then enter the Audit Mode;
- Install apps, drivers, and configure the system settings;
- Prepare the system using the Sysprep utility;
- Boot into Windows PE and Capture an image using the DISM tool.
Then, the resulting image WIM can be added to the installation disk or deployed using different tools such as MDT, WDS, DISM, or ImageX.
Customizing Windows 10 in Audit Mode with Sysprep
You need to customize your reference Windows 10 Image in the Audit Mode. On the installed Windows 10 OS, you can boot Windows 10 to Audit Mode or OOBE by pressing Shift + Ctrl + F3 on the OOBE (out-of-box experience user experience), or the Windows Welcome screen. You can also enter Audit Mode using the Sysprep. To do this, run the command:
C:\windows\system32\sysprep\sysprep.exe
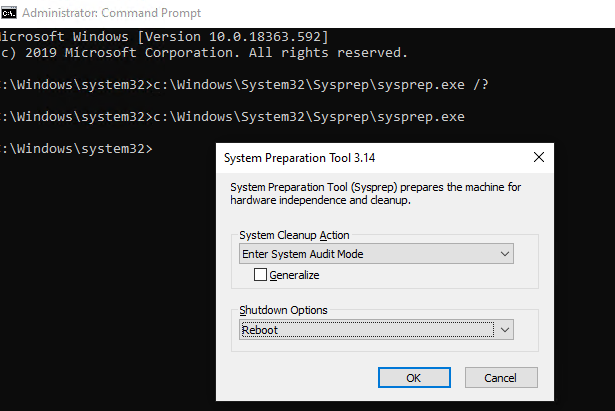
In the System Preparation Tool window, select the options:
- System Cleanup Action: Enter System Audit mode;
- Shutdown Options: Reboot;
- Press the OK button.
The computer will automatically restart and boot to the Audit Mode. Windows 10 automatically boots and logs in with the built-in administrator account when in the Audit Mode. Further, this account will be disabled.
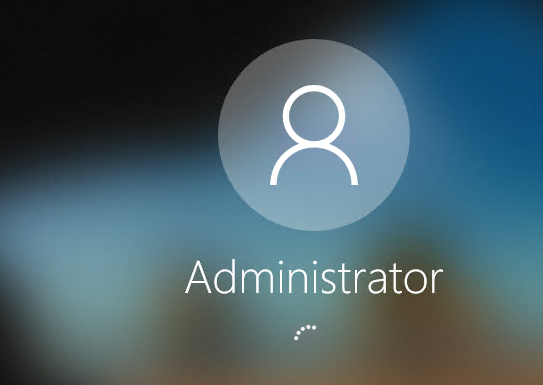
Windows 10 will boot in this mode no matter how many times you rebooted your computer until the Sysprep is running.
There is only one visible sign to understand that you’ve entered the Windows 10 Audit Mode desktop—the Sysprep dialog in the middle of the display. Do not close the Sysprep utility window—you will need it at the end of the configuration step. Minimize it.
In Audit Mode, you can configure your Windows 10 reference image. We will take a look at several popular steps that sysops configuring in their reference image most often.
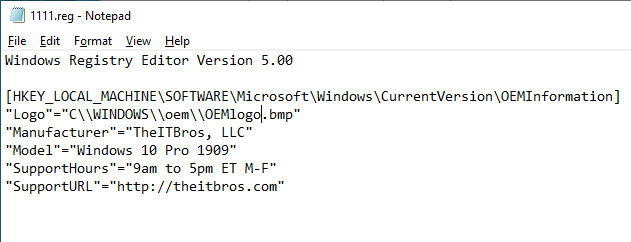
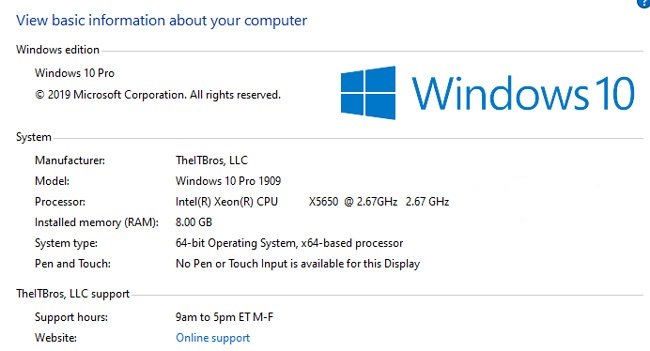
Step 1: Install OEM Information and Logo
You can set your company branded info in the computer properties windows. In this example, we will configure OEMLogo, Company name, tech support web site, and working hours. The easiest way to configure these settings is through the registry. Create a text file oem.reg, and copy the following code into it:
Windows Registry Editor Version 5.00

[HKEY_LOCAL_MACHINE\SOFTWARE\Microsoft\Windows\CurrentVersion\OEMInformation]

“Logo”=”C:\\WINDOWS\\oem\\OEMlogo.bmp”

“Manufacturer”=”TheITBros, LLC”

“Model”=”Windows 10 Pro 1909”

“SupportHours”=”9am to 5pm ET M-F”

“SupportURL”=”https://theitbros.com”

Note. First create the graphic file C:\WINDOWS\oem\OEMlogo.bmp with your company logo.
To apply the reg file, double-click on it, and accept registry changes. As a result, these settings will be imported into the registry.
After rebooting in the System Properties, you can see the following branded info:
Step 2: Install the Drivers and Apps
You can install drivers and third-party programs you would like to see in your Windows 10 image.
You can install programs manually, or using the integrated Windows 10 package manager—Chocolatey.
Now install the Chocolatey. To do this, run the PowerShell console with administrator privileges. Enter the following commands:
Set-ExecutionPolicy Bypass -Scope Process -Force; `

iex ((New-Object System.Net.WebClient).DownloadString('https://chocolatey.org/install.ps1'))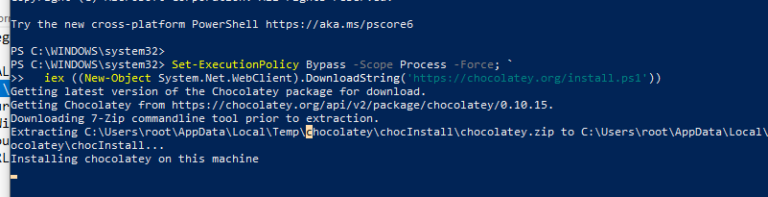
Restart the PowerShell console. Now you can install more programs with a single command.
Let’s say, we want to install Opera, Google Chrome, VLC, Adobe Reader, 7Zip, K-Lite Codec Pack Full, and Zoomit using choco. Run the command:
choco install 7zip, Opera, google-chrome, vlc, adobereader, k-litecodecpackfull,zoom
Tip. You can find packages by their names with the command choco search opera.
You can also install drivers for all computers and laptops models on which you want to deploy this reference Windows 10 image. Download and extract the driver packages to a specific directory. Then search for all *.inf files, and inject all the drivers described there to the Windows image with the command:
for /f %i in ('dir /b /s *.inf') do pnputil.exe -i -a %i
If you need to reboot the Windows to install the application or update, you can do it. After reboot, the system will return to audit mode.
Step 3: Disable Telemetry and Data Collection in Windows 10
Windows 10 collects information about the operation of users on the computer. Examples of handwriting and voice samples, location information, error reports, calendar contents—all of these can be sent to Microsoft servers.
If you do not want the OS sending data to Microsoft’s telemetry servers, you can disable the Telemetry and Data Collection services. Run the elevated Command prompt, and execute the following commands:
sc delete DiagTrack
sc delete dmwappushservice
echo ““ > C:\ProgramData\Microsoft\Diagnosis\ETLLogs\AutoLogger\AutoLogger-DiagTrack-Listener.etl
REG ADD "HKLM\SOFTWARE\Policies\Microsoft\Windows\DataCollection" /v AllowTelemtery /t REG_DWORD /d 0 /f
Also, you can disable Windows 10 tracking using the DisableWinTracking tool from GitHub.
Step 4: Install Windows Security Update in Audit Mode
Starting with Windows 8.1, you cannot install updates using the Windows Update Center in the Settings panel in the auditing mode. The Windows Update Center checks if the system has completed the OOBE stage. If not, the update is not performed.
To update the system from the console, you can take the PSWindowsUpdate Module from TechNet Gallery.
Save the PSWindowsUpdate.zip archive to a USB drive, and (this is important!) right-click on it > Properties > Unblock.
Extract the PSWindowsUpdate.zip to both folders:
- %USERPROFILE%\Documents\Windows\PowerShell\Modules;
- %WINDIR%\System32\Windows\PowerShell\v1.0\Modules.
To download and install all available windows updates, run the commands:
PowerShell -ExecutionPolicy RemoteSigned -Command Import-Module PSWindowsUpdate;

Get-WUInstall -AcceptAll -IgnoreReboot
That’s all! Available updates will be downloaded from the Windows Update servers and installed automatically.
Step 5: Uninstall Built-in UWP Apps
Also, you can uninstall built-in UWM apps, but it’s really up to you. So, if you don’t want to uninstall built-in apps, just skip this step.
Paste the following commands onto the PowerShell console and press Enter:
Get-AppxPackage *3dbuilder* | Remove-AppxPackage

Get-AppxPackage *windowsalarms* | Remove-AppxPackage

Get-AppxPackage *windowscalculator* | Remove-AppxPackage

Get-AppxPackage *windowscommunicationsapps* | Remove-AppxPackage

Get-AppxPackage *windowscamera* | Remove-AppxPackage

Get-AppxPackage *officehub* | Remove-AppxPackage

Get-AppxPackage *skypeapp* | Remove-AppxPackage

Get-AppxPackage *getstarted* | Remove-AppxPackage

Get-AppxPackage *zunemusic* | Remove-AppxPackage

Get-AppxPackage *windowsmaps* | Remove-AppxPackage

Get-AppxPackage *solitairecollection* | Remove-AppxPackage

Get-AppxPackage *bingfinance* | Remove-AppxPackage

Get-AppxPackage *zunevideo* | Remove-AppxPackage

Get-AppxPackage *bingnews* | Remove-AppxPackage

Get-AppxPackage *onenote* | Remove-AppxPackage

Get-AppxPackage *people* | Remove-AppxPackage

Get-AppxPackage *windowsphone* | Remove-AppxPackage

Get-AppxPackage *photos* | Remove-AppxPackage

Get-AppxPackage *bingsports* | Remove-AppxPackage

Get-AppxPackage *soundrecorder* | Remove-AppxPackage

Get-AppxPackage *bingweather* | Remove-AppxPackage

Get-AppxPackage *xboxapp* | Remove-AppxPackage
Generalizing Windows 10 Image Using Sysprep
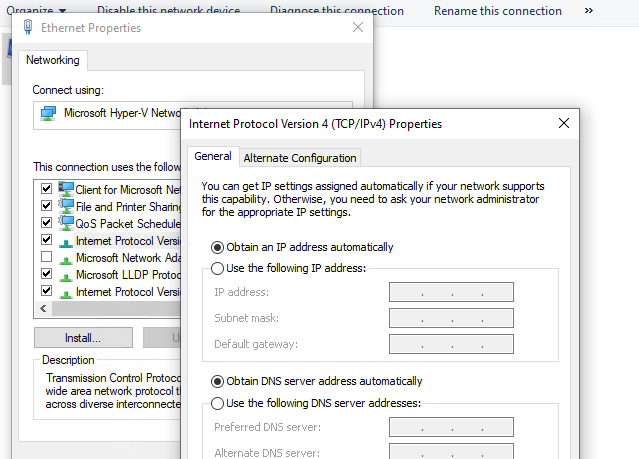
If your computer has a static IP address configured, specify that the address should be obtained automatically (from a DHCP server). You can do that in the network adapter settings.
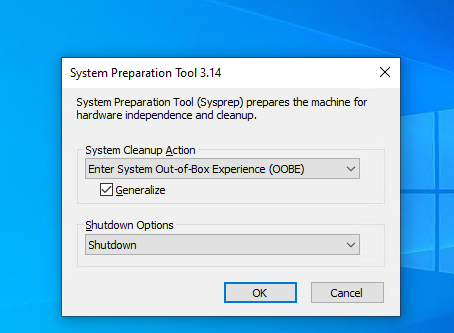
After everything is configured, you can run the Sysprep and select the options:
- System Cleanup Action: Enter System Out-of-Box Experience (OOBE);
- Shutdown Options: Shutdown;
- Check the Generalize option.
Tip. If during running Sysprep an error appears — read carefully the following guide Sysprep Was Not Able to Validate Your Windows Installation.
Using Answer Files with Sysprep for Unattended Windows 10 Installation
You can use an answer file together with the System Preparation (Sysprep) tool. It allows configuring unattended Windows Setup settings. This step is optional (used to automatically specify various parameters that must be configured when the image is at first run). You can skip this step, and go straight to the step of capturing a Windows image.
The answer file may contain the answer to each question. This must be selected when installing Windows and choosing the initial settings (region, language, product key, keyboard, account, and privacy setting, etc.). Follow the steps during the out-of-box experience (OOBE).
Due to the answer file, the number of installer screens is significantly reduced.
How to Create Windows 10 Answer File Using Windows System Image Manager?
You can create an answer file manually (this is simple XML). But it’s more convenient to generate the correct answer file using the Windows System Image Manager (SIM) tool. You can do it from the Windows Assessment and Deployment Kit (ADK).
Download the Windows Assessment and Deployment Kit (ADK) for Windows 10.
Run the adksetup.exe file with administrator privileges. Then select Deployment Tools to install (it includes the latest version of DISM and Windows System Image Manager).

You will need install.wim file with the Windows 10 image you want to deploy. You can copy the install.wim file from the sources directory on the installation Windows 10 ISO image. If only the install.esd file is available in the sources directory, you can convert it to the install.wim.
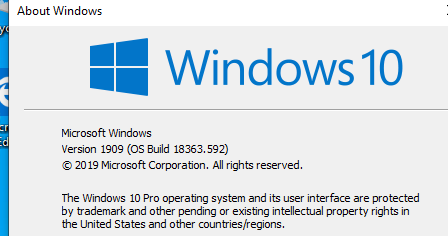
Let’s create an answer unattended file for Windows 10 1909 (Build 18353.592).
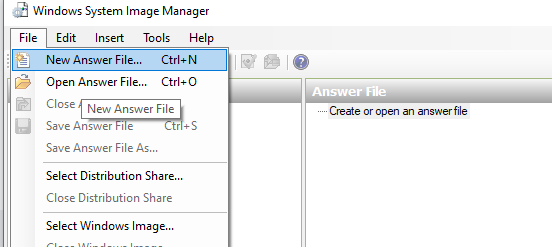
Run the Windows System Image Manager with administrator privileges (C:\Program Files (x86)\Windows Kits\10\Assessment and Deployment Kit\Deployment Tools\WSIM\imgmgr.exe). Select File > New Answer File.
SIM will need you to specify a Windows image file for which you want to create an answer file. Specify the path to the before installed install.wim file.
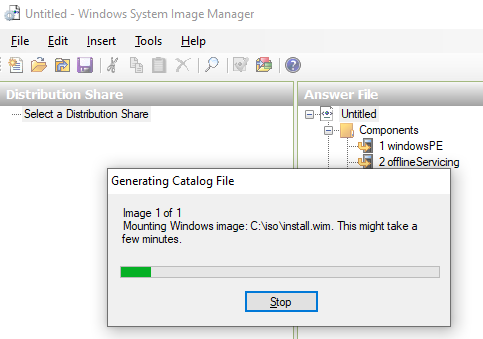
Wait for the SIM to mount the Windows installation image and create the catalog file (.clg). This will take some time, after which the install_Windows 10 Pro.clg file will appear in the directory with the install.wim file.
Note. When we open the install.wim file for Windows 10 1909 using WSIM from the ADK v1903, we received an error:
Windows SIM was unable to generate a catalog
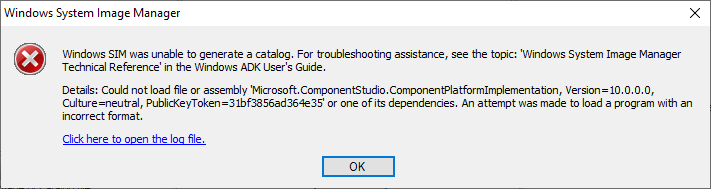
To fix this problem, you need to download the Windows System Image Manager (WSIM) 1903 update (https://go.microsoft.com/fwlink/?linkid=2095334). Unzip the WSIM1903.zip archive to disk. After that replace the WSIM files in the folder C:\Program Files (x86)\Windows Kits\10\Assessment and Deployment Kit\Deployment Tools\WSIM.
Select your Windows 10 edition. If there is only one edition of Windows in your install.wim file, it will be selected automatically.
Using WSIM, you can configure various parameters of the answer file. For example, you can configure the Windows product key (if you are using KMS or MAK keys), time zone, organization and owner info, default language and region settings, input locales, etc.
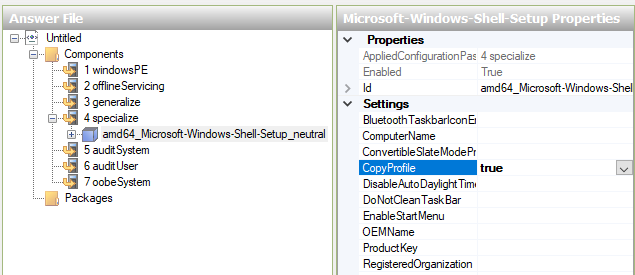
First of all, we need to do the most important thing: to tell Sysprep to copy all our customizations to the default user profile.
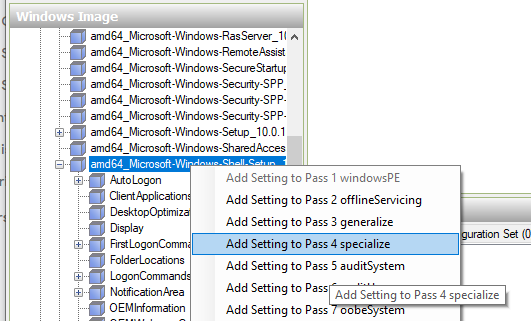
To do this, in the Windows Image section, find the amd64_Microsoft-Windows-Shell-Setup__neutral section. Right-click on it, and select Add Setting to Pass 4 specialize.
Then, in the Answer File panel, expand section 4 Specialize > amd64_Microsoft-Windows-Shell-Setup__neutral. Set the CopyProfile value to TRUE.
Additionally, you can configure the following options in the Answer file.
Pass 1 Windows PE
Choosing an installation language in WinPE:
Microsoft-Windows-International-Core-WinPE
InputLocale: en-US;
SystemLocale: en-US
UILanguage: en-US
UserLocale: en-US
The Windows 10 Product key:
Microsoft-Windows-Setup -> UserData -> ProductKey -> Key = {specify your MAK or GVLK key}
To automatically accept user agreement:
Microsoft-Windows-Setup -> UserData -> AccepptEula = True
Pass 7 oobeSystem
Skip Microsoft account creation screen (MSA):
Microsoft-Windows-Shell-Setup –> OOBE -> HideOnlineAccountScreens = True
Do not ask 3 security questions for your local account:
Microsoft-Windows-Shell-Setup –> OOBE -> ProtectYourPC= 3
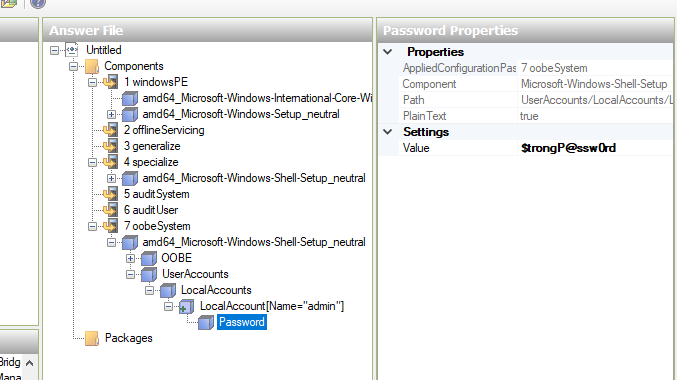
Create a local administrator account and set a password for it:
Microsoft-Windows-Shell-Setup –> UserAccounts –> LocalAccounts -> Insert New Local Account
Name: admin
Group: Administrators
All empty (blank) answer file parameters must be removed.
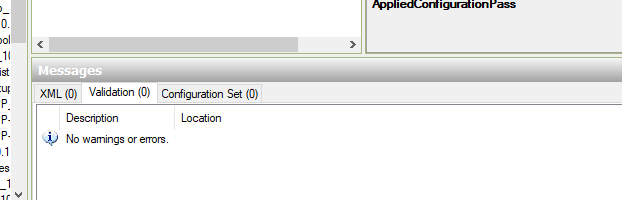
To check the settings in answer files, select in Tools > Validate Answer File option. If you configured everything correctly, a message should appear in the Messages console: No warning or errors.
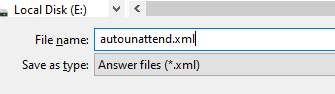
Save the answer file by choosing File > Save Answer File As > autounattend.xml.
Now you can close WSIM.
Generalize Windows Image Using Answer File
Now you can use your autounattend file to the Sysprep your Windows 10 image. Run the elevated command prompt, and execute the following command (replace the path to autounattend.xml with yours):
c:\windows\System32\Sysprep\sysprep.exe /generalize /oobe /generalize /shutdown /unattend:C:\ps\autounattend.xml

With the /generalize option the Sysprep will remove unique computer data. This allows you to safely deploy this reference Windows 10 image on another workstation or laptop. After executing the command, the computer will shutdown.
Capture Reference Windows 10 Using DISM after Generalize
After shutting down your computer, you can capture a customized Windows 10 image using MDT. You can also use other special tools for capturing a Windows image or using DISM. Below we will consider DISM option.
Note. In previous versions of Windows, the ImageX tool could be used to capture and deploy an image. In the latest Windows 10 builds, you can do all this with DISM.
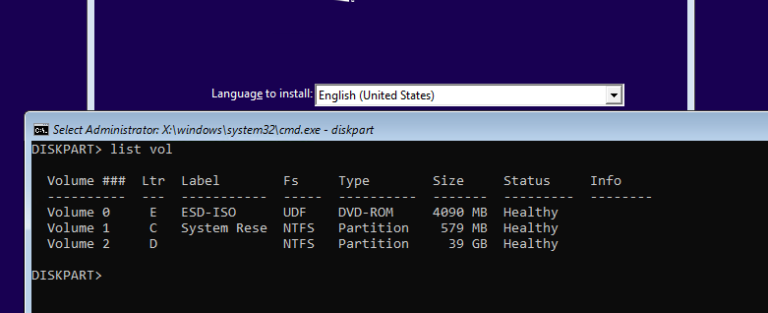
Boot the computer with the Windows reference image into Windows PE. You can do this by booting the computer from the Windows 10 installation disc, or recovery disc.
On the language selection screen, press Shift + F10.
In the command window that opens, type Diskpart command. Use the list vol command to identify the drive letters. In our example, the installed Windows image is located on drive D.
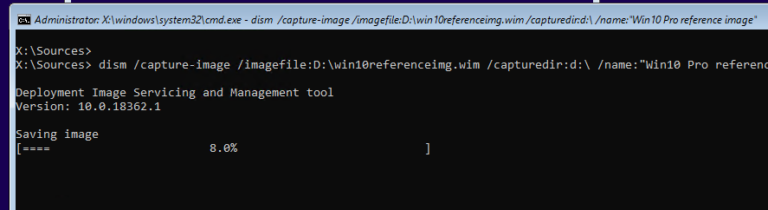
To capture the image, run the command:
dism /capture-image /imagefile:D:\win10referenceimg.wim /capturedir:d:\ /name:"Win10 Pro reference image"
/imagefile — the wim image file that we need to create;
/Capturedir — the reference Windows install folder.
Copy the wim Image file from a local disk. Import it into your deployment software (MDT, SCCM), or put in on the installation drive (rename the file to install.wim). Finally, we did it. After deploying this image to the workstation, you will see that all customizations are there. All the software you installed in Audit Mode is there as well.